Pages

Sunday, July 23, 2017

Things You Need To Know Before Starting A Garage Floor Paint Job

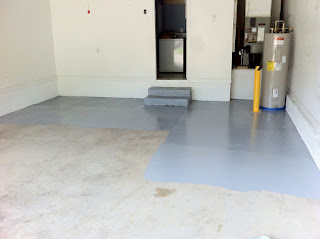
Some garage floors are made of concrete, which is why their original color is depressing and drab. Many people ignore garage floor paint; even though appropriate painting of these floors can keep them safe from cracking, with projections of long-lasting acid or oil stain tolerance.  A garage is a busy place used as a gaming zone or Jam room, thus the need of making it look welcoming. What are some of the things you need to know before starting a garage floor paint job?

Things You Need To Know Before Starting A Garage Floor Paint Job
1:  Types of Paint

First, decide on the characteristics you would like your garage floor to have after painting. There are three unique paint options to pick.

The most famous garage floor paint is epoxy as it offers durability and complete protection against oil stains, grease, and cracks. It is a kind of paint specifically designed for garage floors and is not DIY-friendly. Under epoxy, there are more variations to consider, including solvent based, water based and solid types. Latex, however, is a smart option if you have less experience in this department. Unlike epoxy, one may not power wash or etch the area and simply rinse the dirt before commencing.  Additionally, if you would wish to undo the paint, you can easily wipe it off with water.

Oil based paint is not hard to apply like epoxy, but it is tedious to remove. Therefore, there needs to be some experience before experimenting with oil-based paints.

A completely new way of staining the garage floor is by utilizing concrete stains. Concrete stains include water, acid and mineral salts. The salts are color pigments that offer color shades to the flooring by settling on the concrete’s pores. Even though concrete stains offer sufficient protection to the garage floor, you may not be satisfied with the color variations they offer, as they are semi-transparent. They do not hide the color changes or the gray areas in the concrete to any given extent. Moreover, due to the acidic ingredients, heavy-duty washing of the surface is mandatory before applying the stain. If you are DIY and only want the garage floor to look good-looking, go with latex.

2:  Pre-painting Considerations

Checking the garage floor moisture level is mandatory. You can do this by sticking or taping a plastic bag to the surface for twenty-four hours, and check for any trapped moisture beneath the bag. For positive results, rule out the possibility of using epoxy. Equally, if you have used a concrete sealer previously, you cannot use epoxy as water beads tend to appear. Remove any form of dirt and dust in the garage before proceeding with any paint. You also have to degrease and etch the floor with muriatic acid before epoxy application.

3:  Deciding the New Look

Painting garage floor changes the personality of the whole garage. Therefore, consider the outcome you are aiming for. If you are just painting the floor to make the garage appear less drab, go for shades of white, brown or gray. However, others enjoy giving the floor more attention with shouting shades like shiny black and glossy maroon.
Monday, June 19, 2017

A Buying Guide to Choosing the Best Exterior Paint for Your Homes

Painting the home’s exterior should be done at intervals of ten to fifteen years. Some homeowner takes on the painting project themselves while others opt to go for a professional painter. Whatever you choose, here’s our guide to selecting the best quality exterior paint for your homes.

A Buying Guide to Choosing the Best Exterior Paint for Your Homes
Choosing the right exterior paint

DIY websites like Gardenweb and Diy chatroom have opinions on just every brand and why each is better compared to the other. When you seek professional house painting services for your home, ask the specialist which exterior paints they recommend or prefer working with. Paying keen attention to the suggestions offered will give you a decent idea of the experts’ favored paints. Home improvement stores can also help you choose the best exterior home paints for your geographical location. 

Exterior Paint Buying Guide

The United States' weather varies from one region to the other. Some paints perform well in hot, dry weather regions while other paints may not do so well in colder areas with wet and moist climates. Homes located in the Pacific-Northwest experience wet weather for at least six months a year, and with hot temperatures. Choosing a paint that withstands extreme weather conditions is not easy. When selecting a paint to use on your exterior surface, pick a type of paint that would serve for seven or more years before repainting. This helps you to reduce the long-term expenses associated with contracting a newbie for your paint project.

Best Exterior House Paints:

If you want your house painted and to last a long time, experts advise that you select Sherwin Williams Duration. The exterior paint from Sherwin Williams has a warranty for as long as you own your home. Duration is a latex-based paint that goes for $50 per gallon. If this is too expensive and you still need quality paint with a positive reputation, consider the Sherwin Williams SuperPaint that offers long endurance. Quality exterior paints by Benjamin Moore are renowned and used by many professional paint contractors.

Best Rated Exterior Paint for Houses:

Consumer Reports does extreme tests on paints that show how the paints will be performing three, six and nine years down the road. The paints are exposed to every weather element and then rated based on color change, dirt buildup, cracking, and mildew. Not every paint scores that well after nine years, however, top rated options include Fres-Coat Velvet by California Paints and Premium Plus Ultra Flat Enamel by Behr. The Fres-Coat was excellent in appearance after six years, while the Behr does well with the equivalent of nine years outdoors.

Value Paints:

If you are repainting the house for sell, spending a $1000 on Duration is probably not advisable, as it is better to select a bargain brand that would hold up until you find a buyer. The Kilz and Olympic brands are cheap with Kilz accessible in Wal-Mart stores. These brands offer excellent value but not as long lasting as the premium products from Benjamin Moore or Sherwin Williams. Olympic is sold via Lowes home improvement stores, with some of the five-gallon containers selling online for $100.


Monday, May 15, 2017

DIY Tips and Tricks in Painting Your Garage Floor

The Garage floor is made of concrete, thus the drab and depressing original color. Many people do not pay attention to the types of garage floor paint they use; however, painting garage floors appropriately can prevent it from cracking and protects it from oil stains. A garage is a space that can be used as a Jam or a gaming room; therefore, aim at making it look friendly.

DIY Tips and Tricks in Painting Your Garage Floor
Deciding the New Look

Painting garage floor changes the personality of the whole garage. Therefore, consider the outcome you are aiming for. If you are just painting the floor to make the garage appear less drab, go for shades of white, brown or gray. However, others enjoy giving the floor more attention with shouting shades like shiny black and glossy maroon.

Pre-painting Considerations

Checking the moisture level of your garage is compulsory. You can do this by sticking or taping a plastic bag to the surface for twenty-four hours, and check for any trapped moisture beneath the bag. For positive results, rule out the possibility of using epoxy. Equally, if you have used a concrete sealer previously, you cannot use epoxy as water beads tend to appear. Remove any form of dirt and dust in the garage before proceeding with any paint. You also have to degrease and etch the floor with muriatic acid before epoxy application.

Types of Paint

First, decide on the characteristics you would like your garage floor to have after painting. There are three unique paint options to pick. The most famous garage floor paint is epoxy as it offers durability and complete protection against oil stains, grease, and cracks. It is a kind of paint specifically designed for garage floors and is not DIY-friendly. Under epoxy, there are more variations to consider, including solvent based, water based and solid types. Latex, however, is a smart option if you have less experience in this department. Unlike epoxy, one may not power wash or etch the area and simply rinse the dirt before commencing.  Additionally, if you would wish to undo the paint, you can easily wipe it off with water. Oil based paint is not hard to apply like epoxy, but it is tedious to remove. Therefore, there needs to be some experience before experimenting with oil-based paints.

A completely new way of staining the garage floor is by utilizing concrete stains. Concrete stains include water, acid and mineral salts. The salts are color pigments that offer color shades to the flooring by settling on the concrete’s pores. Even though concrete stains offer sufficient protection to the garage floor, you may not be satisfied with the color variations they offer, as they are semi-transparent. They do not hide the color changes or the gray areas in the concrete to any given extent. Moreover, due to the acidic ingredients, heavy-duty washing of the surface is mandatory before applying the stain. If you are DIY and only want the garage floor to look good-looking, go with latex.


Thursday, April 20, 2017

How to Stain Your Deck Like a Pro

Below are steps that would guarantee a good looking and long-lasting result.

Take your Time

Take your time on each step of the deck staining process. Take your time and let the new, pressure treated lumber weather for some months and dry out before staining it. Leave stain removers on the surface long enough to break down old finishes before rinsing it off. Take your time to prevent spills and overspray on non-targeted surfaces.

How to Stain Your Deck Like a Pro
Preparation

Preparation is essential for the results. Brand-new lumber is cleaned to eliminate 'mill scale’ that is crushing of grain when milling. If left unattended, it may stop stains from penetrating the wood pores. Sodium bicarbonate is great stain remover. It is very efficient for cleaning wood, yet will not harm vegetation and plant life. If there is a buildup of stains on the deck, the job becomes tougher, but not impossible. Use a stain stripper as they are more caustic, carefully following the directions. They can remove most weathered stains in a single application.

Brighteners are Beautiful

This step is most skipped by many homeowners when staining decks, yet it is the easiest step. Wood brighteners are easy to paint. They open up the wood surface improving penetration, neutralizing any stain strippers used, and restoring the look of outdated, weathered wood. To apply them, simply spray and wait for some time before rinsing. They are very easy to apply and have numerous benefits.

Rinse like Mad

Use a lot of water after handling cleaning elements. Though some appear to be safe and harmless, they all need to be rinsed off thoroughly well after usage. If they are left in the wood, these chemicals may resurface after some time and attack and break down the new stain. Hence, after cleaning, rinse the deck to get all of the chemicals out of the wood.

Stay Away from Cheap Stuff

Before you decide which type of stain to buy, remember that you will get what you pay for. Better ingredients are expensive. If you want premium results, then purchase only premium products. Quality differs when it comes to pigments, resins, mildewcides, and many other materials making up the wood stain gallon. So keep off cheap stuff if you want it to last.

Look at Waterborne Stains

Water-based deck stains have been popular the last few years. Air quality regulations have coerced manufacturers to improve these products. Some are now more durable, better and long-lasting compared to conventional oil-based alternatives. Water-based stains easily clean up with water and soap, contain no nasty solvents to breathe, improved resistance to weathering, do not need the wood be totally dry to use them, dry faster than solvents, and are also easier on the environment.

Read the Can; Follow instructions.

Every product differs in a way, hence always read the label for instructions. It takes a few minutes after which you are guaranteed of the right information before you begin. Consider the number of stains to apply, the duration between coats, the period after cleaning, and how long until the wood weathers.

More is never always better.

Applying a semi-transparent wood stain on decks are usually the best. These products allow the wood's natural grain to be visible, enabling the wood to breathe naturally, and are easily reapplied and cleaned. Heed the instructions and do not overuse these types of products. When many stains are used, a film may form, much like paint, which will no longer enable the wood to breathe. The resultant effect is peeling, which is a real mess. Apply only as much stain as the wood can easily absorb.

The Paint Brush is King

Deck stains may be painted in different ways. Using a roller and pump-up garden sprayer are popular methods. Irrespective of how you apply the wood stain, have a paintbrush in hand. The friction and agitation brought about by a paintbrush enable wood to take in more stain.

Take Your Time

When you are done with the project, take a little time before using it. Allow your deck to dry out thoroughly prior to putting it back into use. The stain should dry up first before allowing any foot traffic or returning patio furniture. You have correctly done everything to this point; now ensure you allow it at least 24 hours to dry out before using it.

A Little Maintenance

Some effort can keep your deck looking great longer. You occasionally need to wash the surface of your deck to keep dirt and leaves from damaging the finish. If the deck stains begin to lose its color or showing signs of graying, it may be cleaned using a light stain maintenance coat and wood brightener.


Sunday, March 12, 2017

Hardwood Flooring Installation 101: Acclimation

Every hardwood products are affected by the surrounding environmental conditions. Acclimate the brand new flooring on the surface to be installed, back to standard living conditions while still in the boxes. In case the products are sealed in plastic, then open both ends of the boxes. Duration of time is not a determining factor.

Hardwood Flooring Installation 101:  Acclimation
The aim is to achieve a moisture balance or equilibrium between the new flooring and its environment before actual installation. That is, the humidity conditions and temperatures that will ideally be experienced after the new home moisture removal and the house is occupied. Hardwood flooring is manufactured to a moisture content between six percent and nine percent. If you use a temperature and humidity chart, 40% humidity develops a wood moisture content of 7.7%, which is in an average range.

In the North Eastern Regions like Europe, is the mid-point of the range that a home needs to be in after the new home moisture is eliminated. Other areas may require some acclimations to bring the wood down to 2% of the subflooring. The home should be as much as possible, climate controlled to an average humidity as close to 40%, since this range is the most healthy and comfortable for humans.
In most instances, floorings are ready to install immediately after purchasing. If your house environment falls within this range, the wood flooring will remain unchanged whether in your home or at the temperature controlled warehouse.

The Northeast countries have dry winter and very humid summer climatic conditions. If you acclimated flooring for too long in extreme dry winter conditions and fixed when it has shrunk, it would expand excessively and cup when the wet season arrives. When you acclimate the flooring to high humidity conditions and installed when it is extended, the floor would shrink excessively when the dry season returns resulting in significant gaps between boards.

If you have a structure on piers, a cottage that is not heated during winter, a crawl space, or any conditions that may be considered abnormal, please contact a qualified technician or certified institution. You must also understand that a wood-based subfloor has to be within, or around 2% moisture content of the hardwood flooring before proceeding with the installation process.

Having the wood flooring on the construction site before you meet these conditions will result in a change in dimensions, in particular, the ends. More so, if the humidity is above the recommended levels, the wood ends will absorb moisture first and expand. On the other hand, if the humidity levels were lower than that which is recommended in solid wood, the ends would shrink because of losing moisture. For engineered floorings, the top coat of timber would crack. Problems are therefore created unnecessarily in both cases.


Acclimation is very misunderstood. More often, people are always adamant that wood floorings need to sit in the house two to three weeks before installation to acclimate. Though this was right some time back before the wood was kiln dried when the flooring had to be kept in the house to complete the drying process, this has so far changed with technology. 

Monday, February 20, 2017

Hardwood Flooring Installation 101: Finishing

The durability of the hardwood floors can well be attached to the mere fact that they are resistant to soaking up liquid spills, making the finishing of the hardwood floors tight. A variety of finishes are available in the market, and the type decided on depends on how much exposed the floor is, the traffic experienced as well as the desired stain intensity.

Part 1

Preparing the area

The room to be finished is repaired such that it has to be devoid of any furniture, wall hangings and window treatments. A continuing floor into the closet is emptied.
Get rid of trims using a pry bar, into which a small wood is to be inserted to provide an advantage and prevent damages.

The room is to be protected from fumes and dust by using masking tape to seal all openings. The lighting fixtures are to be covered with trash bags and secured with masking tape. Dust and debris are vacuumed out. Black sports due to water sports are to be treated with a 50-50 bleach solution to eliminate any dark spots.

Part 2

Sanding the floor

An electric drum sander is the best tool to use in sanding. In case you do not have, you can rent from a facility providing such services or borrow from a neighbor.

The machine is tilted back on the onset, and once spinning begins, it gently lowered to the floor. Initially, the 20-60 grit rapper is the starting point, and this consequently rising as the job continues.

Sanding starts from the center of the room stretching outwards to the edges. It extends along the grain overlapping each pass by an inch for complete coverage. The natural flow of the wood is in the grain, held together by a tough line.

The process is to continue, consequently adjusting the grit to its finer gritting of sand paper. For most hardwood, sanding can occur up to almost four times. Thorough cleaning is then necessary before the next sanding session begins, taking care to vacuum and dry clean.
After the sanding activity, there is a need to ensure the floor is clean. Dry cleaning with a wet cloth follows vacuuming. For staining purposes, no sawdust should be seen around the floor.

Part 3

Staining the floor

Staining a floor can highlight the natural and real hues on the wooden floor as well as giving the floor a unique, colorful twist in the manner of appearance. Staining is however not necessary should the current color of the wooden floor be appealing just as it is. 

In choosing the stain type, the quality should come before quantity in the decision-making. Spending much on the gallon should not be much of a bother. When selecting the color, it is important to bear in mind that the color on the charts is not necessarily the color that is going to manifest itself on the floor, this because of fading because of soaking into the wood. 

Before staining, a durable floor sealant is to be applied. It helps do away with events of in even coverage. For the best product, soliciting the help of a professional is necessary.
Stain the floor generously using a brush, roller or rag. After about 15 minutes, using a piece of cloth, the excess stain is removed. The amount of dye to be used is put into a bucket and thoroughly stirred. Additionally, this also plays a part in even coverage. A thin layer is good enough for faster drying, unlike the thick stain layers.

For target results, many additional coats can be added as much as desired. Let each coat dry sufficiently. For water-based stains, 2-6 hours is the drying duration and for the oil-based stains, 6-10 hours is the drying period.

A polyurethane coat is worth considering. A softer finish is achievable with a natural protective barrier based look and can make the floor shine beside a semi-gloss finish. A paint roller is a necessary tool to apply the polyurethane followed by ample drying time. For added shine and protection, an extra coat would be required. Waxing and buffing can replace the polyurethane.

Part 4

Waxing and Buffing the Floor

Waxing seals the wooden floor. Buffing gets rid of the excess wax. It's  difficult and consumes a lot of time, but the effects on the floor are usually magnificent. Waxing and buffing can come before staining, after and without staining at all. Wax should be applied on the dry stained floor.

The right wax is essential. For an untreated floor, any finished product or wax labeled hardwood can do. Some popular ones include the beeswax and the polyurethane found in local stores. All these products pose different appearances and as such, the selection should be a keen process.

The wax is to dry completely, and it could take about 30 minutes or more based on the weather conditions. After about 10 minutes of natural drying, a fan can be used to enhance the drying. Pointing the fan directly to the floor might interfere with the adhesion and thus discouraged.

Buff the floor. It involves eliminating wax on the floor by use of a clean towel. Hand buffing is the way to go about it but putting the towel around a mop can help work without having to go down on all fours.


Once it is done, the process is repeated at least three times for perfect waxing results.  This necessary as it leads to resilient layers protecting the floor. It also helps in the durability purposes of the floor.

Monday, January 16, 2017

Hardwood Flooring Installation 101: How Much Does It Cost?

Besides being one of the few that boost property value, hardwoods are also among the best flooring options because they are beautiful and durable as well. The wood flooring option exists in a variety of designs and finishes, for prospecting users. There exists engineered and solid wood beside the pre-finished and site finished woods. This article considers the costs and materials involved in the installation of the pre-finished hardwood floor in a room of averagely 250 square feet. 

Hardwood Flooring Installation 101: How Much Does It Cost?
The pricing estimate relies on the assumptions that the owner will go for low costs and avoid costs such as 
  • Costs attached to the removal of older flooring. 
  • Replacement or removal of furniture. 

The installation of hardwood flooring can be tackled as a DIY project without many issues. More so, for a property owner, oriented at personally handling the installation process, the wisest option would be to select or go for a pre-finished wood. This because of the nature of the warranty involved, as it is a long one. 

The costs break down:

The average material costs associated with the particular project includes
  • The prep works to get the old floor ready for new installation.  This calls for a thorough assessment of the preexisting sub floor and should by any chance the plywood need replacement, the costs involved in the project would be as follows:  forever plywood of about 4'×8' the price would be $22. 
  • The installation of the newly acquired flooring, irrespective of whether the property owners will personally be involved in the installation process or not, qualified personnel call for the collection and consolidation of all the necessary tools and equipment in the room to be refurbished about a week before the actual installation project begins. The style and design chose directly impacts on the costs but as per hardwoodinstaller.com, an average of $8.5 for each square feet caters for placement of foam underlays or vapor barriers. 
  • Additionally, for a room with the measurements mentioned above, this would translate to about $2063 and suppose the installation was a DIY project, an assumption of about $1250 for the material cost would be in order, and this can be broken down to a price of $4-$6 for every square foot.
  • Any recommended sealants or cleansers, adhesive or glue and an insulating underlay will fall under the additional materials costs. It is a fact that a manufacturers treatment is mandatory for all new installations to help in arriving at the best and desired results. The costs per container of the treatment would thus be about $20 to acquire one.

Some other charges and consideration include:
  • All those who are big fans of the DIY ascertain that the process involved in the replacement of the sub flooring is way above their skill level and as such solicit carpenters help to assist in tackling the installation of concrete bases, plywood, and the new joints. These services are likely to cost about $20-$35 for each hour worked and the job can and is likely to take more than a whole business day to complete efficiently. 
  • The dangers of the fumes attached to the installation are noxious and as such, some homeowners tend to vacate the premises during the installation periods. If sealing off the home area is not a possibility, it is prudent to budget for a day or two in the hotel.